Dec 31, 2008

Bottom Pannel planking / Pose des panneaux de fond de coque

The hull is starting to appear !
Just Before the end of the year celebration, I did a good step forward on the construction. Now the boat has some of her hull in place.
The first two pannels does fit fairly well in place.

I first clamp them in place, then set them with some tempory screw and cleat. It was starting to be late so I did have chance yet to fillet the pannel to the bulkhead.


Here is a view of the transom and the end of the hull (offset about 250 mm) and below is a view of the inside where the hull has been reinforce for the keel.

Juste avant la celebration du nouvel an, j'ai fait un bon pas en avant sur la construction. Maintenant le bateau a une partie de sa coque en place.Les 2 premier panneaux sont maintenant parfaitement en place.


J'ai d'abord tout positionner au serre-joint, puis j'ai mis des tasseaux et des vis temporaire. Il commencer a etre tard donc J'ai n'ai pas encore eu le temps de faire les joints de conge.

Ici une vue du tableau arriere et de la fin de la coque (decalage de 250 mm) and dessous une vue de l'interieur ou les panneaux ont ete renforce pour la quille.

Read more et La suite en Francais !

Dec 30, 2008

Bottom hull pannel / Panneaux de fond de coque

Since 25 foot long sheets is not existing on the market for obvious reason. Part of the fun of boat building is to assemble pannel together. With plywood you can use the good old scarfing methods but with those fancy sandwich pannel there is an easy way, the spline methods.

First dado the pannels the thickness of the core (BTW this is the finger eater router !)


Then insert a spline (here a 15 mm okoume), brush with thickened epoxy, clamp and let set.
On the bottom pannel I also did remove the core to insert a plywood reinforcement where the swing keel is going to rest. Below is a picture of the final result it took me a good sweat and almost 2 hours to get to that point.
Then same thing, epoxy, clamp and time for a solid bonding.
There is a view of the 2 bottom pannel bonded and clamp in my shade, then finish ready to be sand down and install on the boat.

Comme des planches de 7 m de long n'existe pas (ce serait un peu la misere a stocker chez Casto !). Et bien le jeu consiste a raboutter plusieurs panneaux ensemble.
Avec du CP on effectue des scarfs, c'est long et fastidieux, mais avec ce panneau sandwich, on peut utiliser des cles d'assemblage.
D'abord il faux defoncer l'ame en mousse (au passage, je vous presente la defonceuse mangeuse de doigt...)


Ensuite il faut inserer une cle (ici du CP en okoume de 15), apres on applique de l'epoxy chargee, on immobilise et on laisse le temps et la chimie moderne faire son travail. Sur les panneaux de fond de coque, j'ai du retirer l'ame du sandwiche au niveau de la quille et la remplacer par un insert en CP.
Ci dessus une photo une fois le travail fini (cela ma pris pres de 2 heures et une bonne sue pour en arriver la), ensuite meme choise, epoxy, serre-joint et temps pour obtenir une collage bien costaud.
Tout en bas il y a des photos des panneaux colles et clampe dans mon apenti et fini pres a etre poncer sous la tente.

Read more et La suite en Francais !

Dec 27, 2008

Bulkhead set up / Montage des cloisons


Christmas is coming with some wonderfull vacation, allowing me to have full days dedicated to the boat !

Now was the time to level the strong back and to set the bulkhead in place as a frame for the hull.


I used a laser level (on the stand on the left), a plumb line, a center line, a spirit level and a lot of patience !

When all the bulkhead were up I start bonding the longitudinal structure.

After about 3 days of work this is what the frame looks like. It finally start taking the shape of a boat !


Le pere Noel, en plus des cadeaux m'a apporrte 2 semaines de vacances. J'ai donc peu dedie des journee complete a la construction.

C'etait donc le moment de mettre le le marbre de niveau et de monter les cloison pour former la structure qui supporteras la coque.


J'ai utilise un niveau laser (faut vivre avec son temps) mais aussi un fil a plomb, un niveau a bulle, une line d'axe et beaucoup, de patience.

Apres avoir monte toutes les cloisons, j'ai commence a installer les strcutures longitudinales.
Voici un apercu de ce a quoi cela ressemble apres 3 jours de boulot, cela commence a prendre la forme d'un bateau !

Read more et La suite en Francais !

Dec 7, 2008

Tent and Strong back / tente and montage du marbre


Now that a most of the material was cut it was time to really start the job ! With my friend Marc we worked on the assembly of the strong back that we set on the side of my house. That was a good exemple of what can be achieve with some 2x6 and 2x4 !


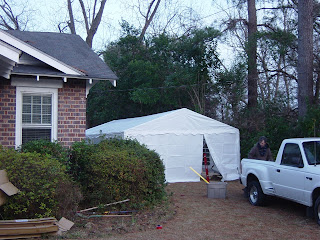
Then I did recrute a lot friend from Florence to put that nice wedding tent of mine together.
That beginning of december was surely really sunny but it was really cold !


It was amazing to find out that a wedding tetn is hold together by tarp and benji cord !

Finnally there is a pictures of what it look likes from the inside and from the outside, the neighbour for sure will have to get use to that white tent for the next couple of month !


Maintenant que la majorite du materiel est decoupe, il etait temps de passer au chose serieuse ! Avec mon pote Marc, nous nous sommes attaque a la fabrication du marbre sur le quel va etre construit le bateau. Nous l'avons installe sur le cote de ma maison, c'etait une bonne experience culturelle de constrcution a l'americaine.

Apres j'ai recrute une grande partie de mes amis de Florence pour construire ma merveilleuse tente de maraiage.Vous pouvez voir que malgre le soleil ca caille dure en caroline.


C'est assez marrant de voir que la tente finalement tient uniquement grace a la toile et a de tres tres nombreux elastique.

Maintenant , voici 2 vues de ce a quoi cela ressemble de l'interieur et de l'exterieur, les voisins vont devoir s'habituer a grande tente pour les prochains mois.

Read more et La suite en Francais !

Nov 24, 2008

Cutting hull and deck pannel / Debit des panneaux de coque et pont

After 2 month working on the bulkhead, it took us 2 month to find someone available to cut the hull and deck pannel ! We found Jesse Rhodes that work with high tower boatworks (check out their website, they are building amazing boat
http://www.hightowerboatworks.com./). If you have a CNC job to do in the Low country area, give him a buzz, Jesse know what he is doing !


So we spent 3 hours in Charleston with Max and Jesse cutting all the hull, deck and roof pannel.

Those are 2 skin of 3 mm okoume with a core of 15 mm PVC foam. Quiet light and very stiff !

For the occasion I rented a nice van to transport the pannel for the 2 boats that we are building.

Difficult to imagine that there is 2 boat worth of matrial in the back of that van !

Apres 2 mois passes a monte les cloisons, il nous a encore fallu 2 mois pour trouver quelqu'un de disponible pour couper les panneaux de coque et de pont. Nous avons rencontre Jesse Rhodes qui travaille avec high tower boatworks (au passage allez visiter son site web, il font de super bateau http://www.hightowerboatworks.com/.)
D'ailleurs si jamais vous avez un debit CN a faire realiser dans le coin de Charleston, appelez Jesse, il fait du super boulot !

Nous avons donc passe 3 heures a Charleston, Max Jesse et moi a debiter les panneaux de coque, de pont et de roof.

Ils sont aussi fait en sandwich, 2 peaux d'okoume de 3 mm et une ame en mousse de PVC de 15 mm, tres leger et tres rigide !

Pour l'occasion j'ai loue un van tout neuf pour transporter les panneaux pour les 2 bateaux. Si il avait ete noir, je me serais pris pour Baracudda dans l'agence tout risque !

Difficile de croire qu'il a de quoi fabriquer 2 bateaux a l'arriere de ce van, non ?


Read more et La suite en Francais !

Jul 28, 2008

Bulkhead assembly / Assemblage des cloisons

It all started last july when we cutted the bulkhead at charleston wood work, big thanks to Russ for the time he spent with us on that Saturday !

So all the summer was about taking each small pieces of the wood nidacore sandwich, to glue it together in the shape of the bulkhead.


There is 12 bulkhead total. Quiet a job especially in the hot, and humide weather of south carolina !

On the picture you can see the bulkhead #3 that will take the load of the inner forestay going upwind .

And in the back there is more small piece to be put together !
It took me about 2 month and about 20 C-clamps to get all of those nicely bonded together !

Alors tout a commence en juillet dernier quand nous avons decoupe les panneaux de cloison a Charleston wood work. D'ailleurs un grand merci a Russ d'avoir accepter de passer tout un samedi pour faire ce boulot !

J'ai donc passer tout mon ete, a prendre chacune des pieces des panneaux de sandwich Nidacore, a les colles ensemble en forme. Il y avait 12 cloison a reconstituer au total. Ce n'etait pas un petit boulot surtout dans le fameux ete Sud Carolinien si chaud et humide !

Sur la photo, vous pouvez voir la cloison #3, cloison d'etais volant. Au deuxieme plan, vous pouvez voir d'autre piece de Nidacore qui attende leur tour .

Au total, cela m'a pris pres de 2 mois (je vous dit qu'il fait tres chaud l'ete !) et pres de 20 serre joint pour realiser tout ces collages.

Du beau boulot !


Read more et La suite en Francais !